Android Studio(メモリストのアプリ14_Espressoでの試験)
■メモアプリのテストをEspressoで実行する。
テストフレームワークEspressoで前回挙げたテスト項目ができないか試してみる。サンプルコードを見てみると、Androidのテキストボックスやボタンなどのコンポーネント部分を自動化できるよう。そのため、ボタン操作を行う7から26の項目で自動化できないか見てみた。
先にEspressoを使うにあたっての設定。まず、build.gradleの中に、testOptionsを追加して、必要な依存関係を追加。
    defaultConfig {...}

    testOptions {
        unitTests {
            includeAndroidResources = true
        }
        managedDevices {
            devices {
      pixel5api34(com.android.build.api.dsl.ManagedVirtualDevice) {
            device = "Pixel 5"
            apiLevel = 34
            systemImageSource = "aosp-atd"
                }
            }
        }
    }

    buildTypes {...}
依存関係は、デフォルトで入っているものもあるけど下のようにした。追加後に、sync now を行うと必要なものがダウンロードされた。ここで、testImplementation とか androidTestImplementation とかあるけど、これらは、test や androidTest のフォルダで有効になるよう。テストファイル(NoteApp_test)は、testフォルダ内に作成したので、testImplementatoin(androidTestフォルダ内に作成したら、テスト実行時にConfig関係でNullPointerExceptionのエラーが出た)。
dependencies {
implementation 'androidx.appcompat:appcompat:1.6.1'
implementation 'com.google.android.material:material:1.9.0'
implementation 'androidx.constraintlayout:constraintlayout:2.1.4'
testImplementation 'junit:junit:4.13.2'
testImplementation 'androidx.test.ext:junit:1.1.5'
testImplementation 'androidx.test.espresso:espresso-core:3.5.1'
testImplementation 'androidx.test:core:1.5.0'
testImplementation 'androidx.test:runner:1.5.2'
testImplementation 'androidx.test.espresso:espresso-intents:3.5.1'
testImplementation 'org.robolectric:robolectric:4.11'
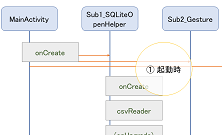
}それぞれのファイルの場所は下のような感じ。

コードは下の通り。
package com.example.sampleproject006_sqlite;
import static androidx.test.espresso.Espresso.onView;
import static androidx.test.espresso.action.ViewActions.clearText;
import static androidx.test.espresso.action.ViewActions.click;
import static androidx.test.espresso.action.ViewActions.closeSoftKeyboard;
import static androidx.test.espresso.action.ViewActions.doubleClick;
import static androidx.test.espresso.action.ViewActions.typeText;
import static androidx.test.espresso.assertion.ViewAssertions.matches;
import static androidx.test.espresso.matcher.ViewMatchers.hasChildCount;
import static androidx.test.espresso.matcher.ViewMatchers.isChecked;
import static androidx.test.espresso.matcher.ViewMatchers.isNotChecked;
import static androidx.test.espresso.matcher.ViewMatchers.withId;
import static androidx.test.espresso.matcher.ViewMatchers.withText;
import android.os.Build;
import android.view.View;
import android.view.ViewGroup;
import androidx.test.espresso.intent.Intents;
import androidx.test.ext.junit.rules.ActivityScenarioRule;
import androidx.test.ext.junit.runners.AndroidJUnit4;
import org.hamcrest.Description;
import org.hamcrest.Matcher;
import org.hamcrest.TypeSafeMatcher;
import org.junit.After;
import org.junit.Before;
import org.junit.Rule;
import org.junit.Test;
import org.junit.runner.RunWith;
import org.robolectric.annotation.Config;
@RunWith(AndroidJUnit4.class)
@Config(sdk = Build.VERSION_CODES.P)
public class NoteApp_test {
private static final String BUTTON_NAME_REG = "Register";
private static final String BUTTON_NAME_DEL = "Delete";
;
/**
* Use {@link ActivityScenarioRule} to create and launch the activity under test.
*/
@Rule
public ActivityScenarioRule<MainActivity> activityScenarioRule =
new ActivityScenarioRule<MainActivity>(MainActivity.class);
@Before
public void intentsInit() {
// initialize Espresso Intents capturing
Intents.init();
}
@After
public void intentsTeardown() {
// release Espresso Intents capturing
Intents.release();
}
@Test
public void try_test() {
}
@Test
public void test8_check_Checkbox() {
onView(nthChildOf(withId(R.id.FramL01), 0)).perform(click());
onView(nthChildOf(withId(R.id.FramL01), 0)).check(matches(isChecked()));
}
//以降のテストは省略。
//ネットから持ってきた子要素を要素番号から取得するコード。
public static Matcher<View> nthChildOf(final Matcher<View> parentMatcher, final int childPosition) {
return new TypeSafeMatcher<View>() {
@Override
public void describeTo(Description description) {
description.appendText("position " + childPosition + " of parent ");
parentMatcher.describeTo(description);
}
@Override
public boolean matchesSafely(View view) {
if (!(view.getParent() instanceof ViewGroup)) return false;
ViewGroup parent = (ViewGroup) view.getParent();
return parentMatcher.matches(parent)
&& parent.getChildCount() > childPosition
&& parent.getChildAt(childPosition).equals(view);
}
};
}
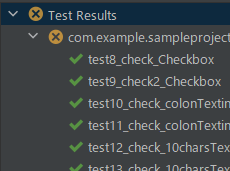
}テストコードの実行画面が下のもの。テストが成功したところ(✔)、失敗したところ(✖)、プログラムエラーが出たところ(!)といった形でマークが出ている。

画面のコンポーネントの動作は一通り確認できそう。データベースの作成とかサービスの実行とかまでできるか分からないけど、このテストの作成もそこそこ手間がかかるので、試験パターンが少ないものは画面上から確認した方が速いと思う。
JUnitとかでもそうだけど、入力と出力の間に何かしらのロジックがあって、ロジックを少し修正した時にもう一度入出力が問題ないか確認するときには便利かも。仕様書ベースでテストケースを作成すればコードのチェックにもなるし。